Have you ever found yourself in a situation where capturing a screenshot on your Samsung device became an absolute necessity, but shooting the screen with another device simply was not a practical option? Fear not, because Samsung offers a diverse range of 16 unique ways to take a screenshot.
Come with us as we delve into these remarkable methods, ensuring you never miss a beat when it comes to capturing your screen on a Samsung phone or tablet.
- Screenshot using Side (Power Button) and Volume Down Keys
- Screen Capture using 'Take Screenshot' Button on the Quick Settings Panel
- Do Screenshots using the Palm Swipe
- Screenshot using Digital Assistants
- Access the Screenshot using the Edge Panel
- Screencopy using Samsung S Pen
- Shoot a Screenshot using Assistant Menu
- Screengrab using Game Booster
- Screenshot using Good Lock Modules
- Take Screenshots using Bixby Routines+ and Modes and Routines
- Screen Capture using NavStar
- Grab Screen using One Hand Operation+
- Do Screenshots using RegiStar
- Conclusion
Screenshot using Side (Power Button) and Volume Down Keys
Do you believe that the physical buttons on the mobile device, located on either the left or right side, serve the sole purpose of turning off the device or waking the screen? Fortunately, they also have the function of capturing the screen.
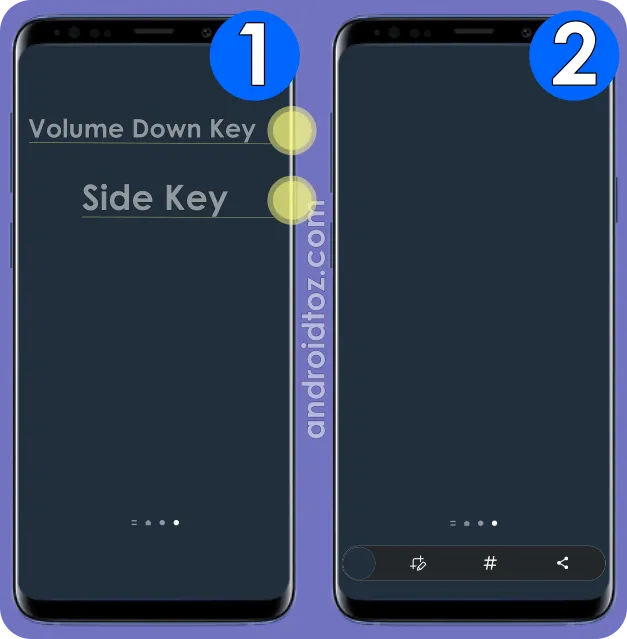
Here is how to take a screenshot on Samsung using the Side and Volume Down Keys:
- Press the 'Side Key' (Power Button) to turn on the screen.
- Open the app, page, or screen you wish to take a screenshot of.
- Ultimately, press the 'Side Key (Power Button)' and 'Volume Down' keys at the same time.
Screen Capture using 'Take Screenshot' Button on the Quick Settings Panel
The physical buttons on your phone or tablet may not be working, or you might find them less comfortable to use due to larger fingers. Luckily, there are alternative methods for capturing screenshots, such as using the 'Take Screenshot' button found on the Quick Settings Panel.
New to the concept of the Quick Settings Panel? It is a menu designed for convenient access to frequently used settings and shortcuts on Samsung devices which can be accessible by simply swiping down from the top of the screen and includes quick-access buttons for functions such as Wi-Fi, Bluetooth, Mobile Hotspot, Smart View, Screen Recording, and more.
Understand what the Quick Settings Panel is? If so, here is how to take a screenshot using the 'Take Screenshot' button located in the Quick Settings Panel:
- Press the 'Side Key' (Power Button) to wake the screen and unlock the device.
- Open the app, page, or screen you wish to take a screenshot of.
- Swipe down twice from the top of the screen using one finger or swipe down once from the top of the screen using two fingers to access the 'Quick Settings Panel'.
- Swipe left to find and tap on the 'Take Screenshot' button.
- After pressing the relevant button, the screenshot will automatically capture the last opened page, app, or screen.
- Consequently, it only offers the capability to choose the screen you wish to capture before touching the button, but not after.
Troubleshoot: No 'Take Screenshot' Button on Quick Settings Panel
Checked all the buttons on the Quick Settings Panel but couldn't locate a 'Take Screenshot' button? Some buttons are intentionally omitted from the panel to maintain a simple and cohesive design, and this might be the reason why 'Take Screenshot' is not included in the available buttons of the Quick Settings Panel.
Here is how to add the 'Take Screenshot' button to the Quick Settings Panel:
- Swipe down once from the top of the screen using two fingers or swipe down twice from the top of the screen using one finger to open the Quick Settings Panel.
- Go to the end of the panel by swiping left and tap the '+' (Add) button.
- Alternatively, tap three-vertical-dots︙at the top right and select 'Edit Buttons'.
- Touch, hold, and move the 'Take Screenshot' button to the lower panel from 'Available Buttons'.
- Tap 'Done'.
Do Screenshots using the Palm Swipe
Seeking a unique approach to screenshots? How about giving a try for 'Palm Swipe to Capture'? It is a quick and convenient way to do screenshots on Samsung phones and tablets.
By swiping the edge of your hand from either the left-to-right or right-to-the left side of the screen, you can capture the screen without a need for physical buttons or direct screen touching, except for a slight touch during swiping.
Here is how to screenshot using Palm Swipe to Capture:
- Enable the 'Palm Swipe to Capture' feature:
- Open 'Settings'.
- Select 'Advanced Features'.
- Tap 'Motions and Gestures'.
- Tap the toggle next to 'Palm Swipe to Capture' to turn it on.
- Open the app, page, content, or screen you want to capture.
- Position your hand vertically, touch the edge of your palm to the left or right screen edge, and swipe in the opposite direction.
Screenshot using Digital Assistants
Grab Screen using Bixby
Feeling preoccupied and not in the mood to interact with the screen or use hardware buttons? In such cases, Samsung's good old digital assistant, Bixby, comes with a solution.
It provides a highly convenient way to capture the screen, only requiring a voice command to activate and another to take a screenshot.
Here is how to grab the screen using Bixby:
- Unlock the Samsung device and open the content, page, app, or screen you want to do the screenshot of.
- Say 'Hey Bixby' to wake Bixby.
- Alternatively, press and hold 'Side Key' as long as 'Side Key Press and Hold' is set to 'Wake Bixby' or...
- Open the 'Bixby' app.
- Say 'Take a screenshot, please' or something equivalent.
- The screenshot will be saved to the Gallery and Screenshots folder in My Files > Internal Storage > DCIM.
Take Screenshots using Google Assistant
How about using Google Assistant? The truth is, it might not respond to the ' Screen Recording' command on Samsung devices, but it can certainly understand and execute 'Take a Screenshot.' Hence, if you are looking for an alternative to Bixby, Google Assistant is the only default choice.
Here is how to take a screenshot using Google Assistant:
- Unlock the Samsung device and open the content, page, app, or screen you wish to capture a screenshot.
- Say 'Hey Google' to activate Google Assistant.
- Alternatively, swipe diagonal up from the bottom left or right edge of the screen.
- Say 'Take a Screenshot' or something equivalent.
- The screenshot will be saved to the Gallery and Screenshots folder in My Files > Internal Storage > Pictures.
Access the Screenshot using the Edge Panel
Besides the Quick Settings Panel with its customizable quick-access buttons, Samsung provides 'Edge Panels' with similar features and shortcuts. They are accessible by tapping the Edge Panel Handle and swiping from the edge of the screen inward, usually from the right edge.
They provide not just one but two 'Take a Screenshot' buttons on separate panels: one can be found in 'Smart Select' and the other is located in 'Tasks' panel.
Capture Screen using the 'Smart Select' Panel
Samsung S Pen enthusiasts should be acquainted with 'Smart Select' in the Air Commands Menu, which enables selecting a capture shape like a rectangle or oval to snap a specific part of the screen and save it to the Gallery. Similarly, the 'Edge Panel' version of Smart Select offers the same features.
Here is how to screen capture using the Smart Select Panel:
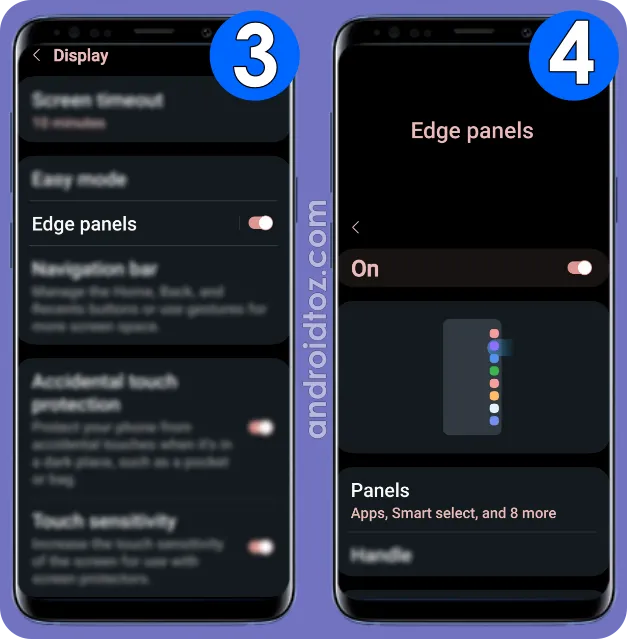
- Enable 'Edge Panel' and add 'Smart Select' panel using Settings:
- Open 'Settings'.
- Select 'Display'.
- Make sure the toggle is on beside 'Edge Panels'.
- Tap on 'Edge Panels' to display further adjustments.
- Tap 'Panels'.
- Tick 'Smart Select'.
- Touch the 'Edge Panel Handle' on the right edge of the screen and swipe inward.
- Swipe left or right to find the 'Smart Select' panel consisting of Rectangle, Oval, Animation, and Pin/Insert.
- Select the capture shape (Rectangle, Oval, etc.,).
- Adjust the snapping area using resize handles and tap 'Done'.
- Tap the 'Save' button.
- The screenshot will be saved to the Gallery and Screenshots folder in My Files > Internal Storage > DCIM.
Snap Screen using the 'Tasks' Panel
The second option is exclusive to Edge Panels in its mobile device placement, yet it performs precisely the same function as simultaneously pressing the Side and Volume Down keys, so there is no difference in functionality.
Here is how to snap the screen using the Tasks Panel:
- Activate the 'Edge Panel' and add the 'Tasks' panel using the Settings:
- Open the 'Settings'.
- Choose 'Display'.
- Ensure that the toggle next to 'Edge Panels' is turned on.
- Tap on 'Edge Panels' to access additional settings.
- Select 'Panels'.
- Check 'Tasks'.
- Open the app, page, or screen you wish to take a screenshot of.
- Tap the 'Edge Panel Handle' on the right edge of the screen and swipe inward.
- Swipe left or right to locate the 'Tasks' panel that includes features such as Video, Create New Contact, Add Alarm and Take Screenshot.
- Tap 'Take Screenshot'.
- In case the 'Take Screenshot' button is not available, tap 'Edit' on the 'Tasks' panel > touch, hold, and drag the 'Take Screenshot' button to the 'Tasks' panel and save the settings.
- The screenshot will be automatically taken and saved to the Gallery and the Screenshots folder within My Files > Internal Storage > DCIM.
Screencopy using Samsung S Pen
Prefer the comfort and effectiveness of using an S Pen instead of your fingers, especially when taking notes for work or school, and looking for a way to take screenshots with the stylus? Just like Edge Panels, Samsung's pen provides two shortcuts: 'Smart Select' which functions exactly like its Edge Panel counterpart, and 'Screen Write'.
Here is how to screen copy using Samsung S Pen:
- Add 'Smart Select' and 'Screen Write' S Pen features to the Air Command Menu:
- Open 'Settings'.
- Select 'Advanced Features'.
- Tap 'S Pen'.
- Tap 'Air Command'.
- Tap 'Shortcuts'.
- Remove the existing two shortcuts and add 'Smart Select' and 'Screen Write' to the Air Command Menu.
- Open the app, page, or screen you wish to take a screenshot of.
- Remove S Pen.
- Select the screenshot option on the Air Command Menu:
- Smart Select (orange shot icon): allows you to choose a shape for capturing, such as a rectangle or oval, to capture a specific area of the screen using S Pen and store it in the Gallery.
- Screen Write (purple doodle icon): takes the screenshot directly and lets you add additional notes over the screenshot using S Pen or save it to the Gallery without adding any screenwriting.
- The screenshot will be saved to the Gallery and the Screenshots folder within My Files > Internal Storage > DCIM.
Shoot a Screenshot using Assistant Menu
It is possible to take a screenshot on Android using 'Assistant Menu' which is an accessibility feature specially designed to assist Galaxy users with physical disabilities by providing a virtual on-screen menu that consists of quick access shortcuts and functions that make the device easier to use for individuals who may have difficulty interacting with the touchscreen, buttons, or other physical aspects of the device.
However, it is a convenient menu to do screenshots with ease without being a person with physical or motor disabilities.
Here is how to shoot a screenshot using Assistant Menu:
- Enable 'Assistant Menu':
- Open 'Settings'.
- Select 'Accesibility'.
- Tap 'Interaction and Dexterity'.
- Tap the switch next to 'Assistant Menu'.
- Read the information on the screen and tap 'Allow'.
- Open the app, page, or screen you wish to take a screenshot of.
- Tap 'Assistant Menu'.
- Tap 'Screenshots'.
- The screenshot will be saved to the Gallery and the Screenshots folder within My Files > Internal Storage > DCIM.
Fix: No 'Screenshot' Button on Assistant Menu
Enabled the 'Assistant Menu' and it appeared on the screen, but there is no 'Screenshots' button within it? While this button is generally included as the system default, its presence can vary depending on the specific model of your mobile device. Therefore, you may need to add it using the device's settings.
Here is how to add the 'Screenshots' button to the 'Assistant Menu':
- Open 'Settings'.
- Select 'Accesibility'.
- Tap 'Interaction and Dexterity'.
- Tap directly on 'Assistant Menu' to display additional settings.
- Tap 'Select Assistant Menu Items'.
- Touch, hold, and drag the 'Screenshots' button to the upper menu.
Screengrab using Game Booster
Engaged in gaming, eager to capture a remarkable moment, and facing the issue of non-functional physical buttons? Plus, you are hesitant to exit the game, as it might vanish when pushed to the background. Is there a solution? Absolutely, introducing Game Booster.
Game Booster is essentially a gaming performance enhancement mode that offers additional features such as screen recording, game plugins, taking screenshots, and more.
Here is how to screengrab using Game Booster:
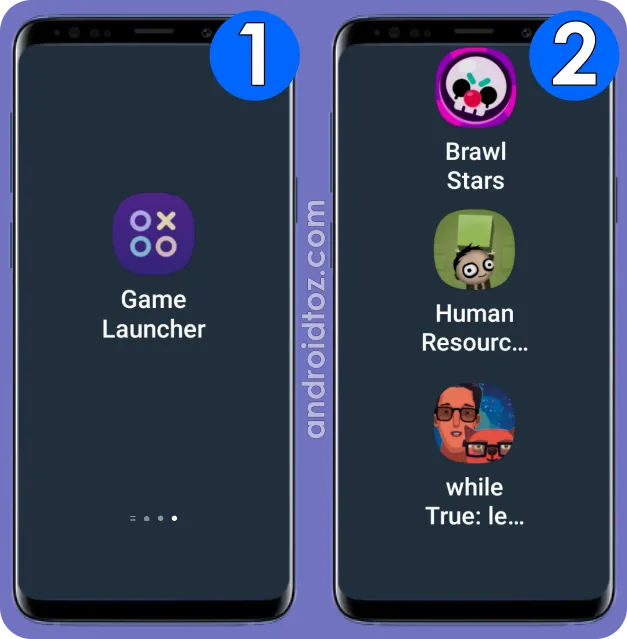
- Open 'Game Launcher' and launch a game.
- Open 'Game Booster':
- For the ones using 'Gestures' as the navigation bar:
- Swipe down from the top of the screen to open the 'Notifications Panel'.
- Find 'Game Booster: Tap to Open Game Booster' and tap on it.
- For the ones using 'Buttons' as the navigation bar:
- Swipe up from the right of the screen (while in landscape/horizontal mode) or swipe up from the bottom of the screen (while in portrait/vertical mode).
- Tap the 'Game Booster' button beside the 'Recents' button.
- Tap the 'Screenshot' button.
- The screenshot will be saved to the Gallery and the Screenshots folder within My Files > Internal Storage > DCIM.
Screenshot using Good Lock Modules
Take Screenshots using Bixby Routines+ and Modes and Routines
Have you ever come across 'Modes and Routines'? It is a Samsung-exclusive app designed to automate various basic and advanced tasks using Artificial Intelligence (AI). These actions are triggered by user usage patterns or specific button actions which we will demonstrate how to employ for taking screenshots.
'Button Actions' are not among the default trigger actions in Routines, and this is where Bixby Routines+ steps in to offer assistance. Bixby Routines+ enhances the capabilities of Bixby Routines by introducing additional and valuable features, such as 'Button Actions', for creating even more potent routines.
Here is how to take screenshots using Bixby Routines+:
- Install the 'Good Lock' and 'Routines+' module in it.
- Good Lock and particular modules might not be available in all countries.
- Open 'Routines+' and make sure 'Button Action' is available in 'Location based Quick Access' category.
- Otherwise, uninstall and install only the 'Routines+' module.
- Open 'Settings'.
- Select 'Modes and Routines'.
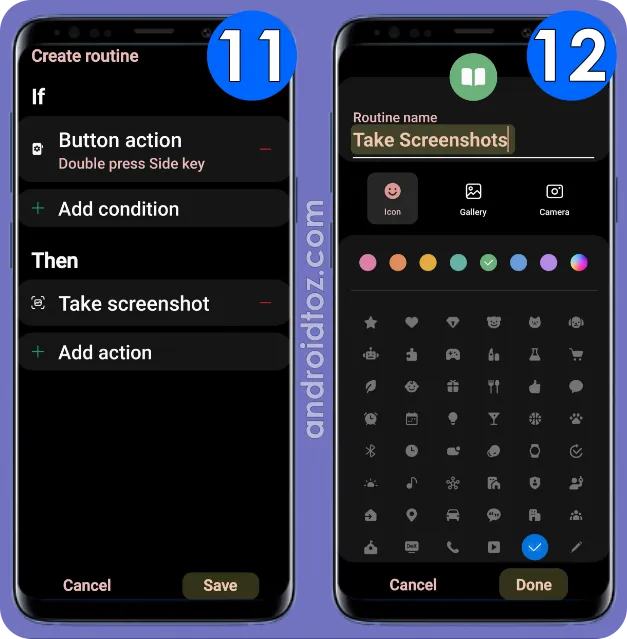
- Tap '+ (Create)' button at the top right.
- Tap 'Add what will trigger this routine' under 'If'.
- Select 'Button Action'.
- Choose 'Side' for the 'Key' and 'Double Press' for the 'Interaction'.
- If you like, select 'Volume Down or Up' for the 'Key' and 'Press and Hold' for the 'Interaction'.
- Tap 'Done'.
- Tap 'Add what this routine will do' under 'Then'.
- Tap 'Functions'.
- Select 'Take Screenshot'.
- Tap 'Save'.
- Enter a routine name, select an icon and color for the routine, and tap 'Done'.
- Open the app, page, or screen you wish to take a screenshot of.
- Double press the 'Side Key' (Power Button) to take a screenshot.
- Provided that you have selected another key and interaction, press these instead.
Screen Capture using NavStar
Don't want to bother with remembering any screen capture shortcuts? Consider adding a dedicated 'Screen Capture' button to your navigation bar for effortless and hassle-free screenshots.
Here is how to add a 'Screen Capture' button to the navigation bar:
- Install the 'Good Lock' and 'NavStar' module in it.
- Good Lock and particular modules might not be available in all countries.
- Open the 'Good Lock' app.
- Select 'Make Up' and open 'NavStar'.
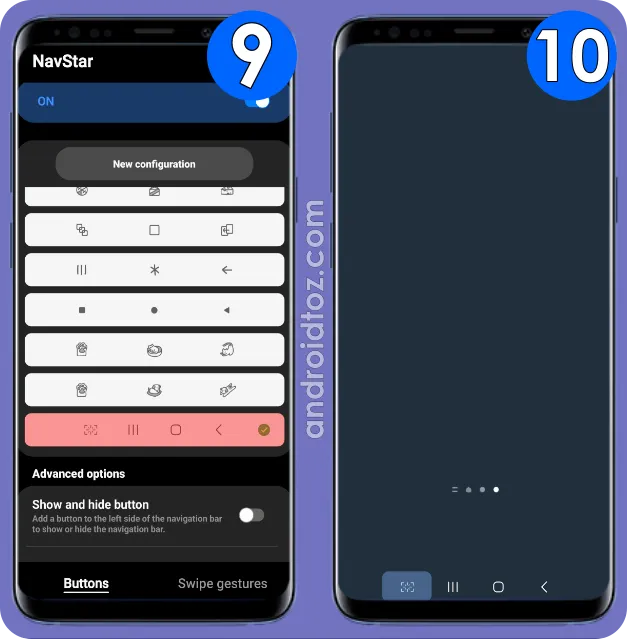
- Choose the 'Buttons' menu and tap 'New Configuration'.
- Select the 'Button Layout' and tap 'Add Button'.
- Tap 'Screen Capture' to move it to the added buttons and tap 'Done'.
- Tap 'Save'.
- Select the new button layout, you have just created, from the list.
- It is generally saved to the end of the list.
- Open the app, page, or screen you wish to take a screenshot of.
- Tap the 'Screen Capture' button on the navigation bar to take a screenshot.
- The screenshot will be saved to the Gallery and the Screenshots folder within My Files > Internal Storage > DCIM.
Grab Screen using One Hand Operation+
Assume that you are on the go and holding something in your other hand (e.g., a cup of coffee, a heavy bag) and you need to quickly grab the screen and respond to a text message with the screenshot without using both hands? Is it possible? Absolutely, you can accomplish this, thanks to the One Hand Operation+ module within Good Lock.
Put simply, One Hand Operation+ adds gesture handles on the screen's left or right sides, allowing one-handed control of your phone or tablet. These handles support both short and long swipes, which you can customize for different actions. For example, a short swipe left can be set for taking a screenshot, while a long diagonal up can trigger screen recording.
Here is how to grab the screen using One Hand Operation+:
- Install the 'Good Lock' and 'One Hand Operation+' module in it.
- Good Lock and particular modules might not be available in all countries.
- Open the 'Good Lock' app.
- Select 'Life Up' menu and tap the 'One Hand Operation+' module.
- Tap the toggle at the top right to enable the module per se.
- Tap the 'Left Handle' or 'Right Handle' toggle to turn it on.
- Tap directly on 'Left Handle' or 'Right Handle' to display additional settings.
- Select a swipe action (Straight left/right, Diagonal up, or Diagonal down) and tap to select the swipe action.
- Select 'Screenshot'.
- Open the app, page, or screen you wish to take a screenshot of.
- Do the swipe action you have selected (Straight left/right, Diagonal up, or Diagonal down) to capture the screen.
- The screenshot will be saved to the Gallery and the Screenshots folder within My Files > Internal Storage > DCIM.
Do Screenshots using RegiStar
Apart from customizing the Settings menu, RegiStar provides alternative and unique ways to take a screenshot named 'Side Key Press and Hold to Screenshot' and 'Double or Triple Back Tap to Screenshot'.
Set 'Take Screenshot' as the Side Key Press and Hold Action
Not a big fan of opening the 'Power Off Menu' to turn off the mobile device or 'Bixby' to ask what is the weather like tomorrow and looking for a more useful way to use the Side Key Press and Hold action? If it comes to that, the solution is in the RegiStar module.
Here is how to set 'Side Key Press and Hold Action' as 'Take Screenshot':
- Install the 'Good Lock' and 'RegiStar' module in it.
- Good Lock and particular modules might not be available in all countries.
- Open the 'Good Lock' app.
- Select the 'Life Up' menu and open 'RegiStar' module.
- Select 'Side-Key Press and Hold Action'.
- Tap the toggle to enable the functionality.
- Note that, it has priority over the menu (Settings > Advanced Features > Side Key) in Global Settings. It means that the 'Power Off Menu' or 'Wake Bixby' is overridden.
- Select 'Take and Share Screenshot'.
- Tap the 'Settings (Gear)' next to 'Take and Share Screenshot'.
- Select 'Basic' to just take a screenshot or select 'Share' to both take screenshots and open 'Share Menu' to share it using Quick Share, Private Share, or any other social media app.
- Open the app, page, or screen you wish to take a screenshot of.
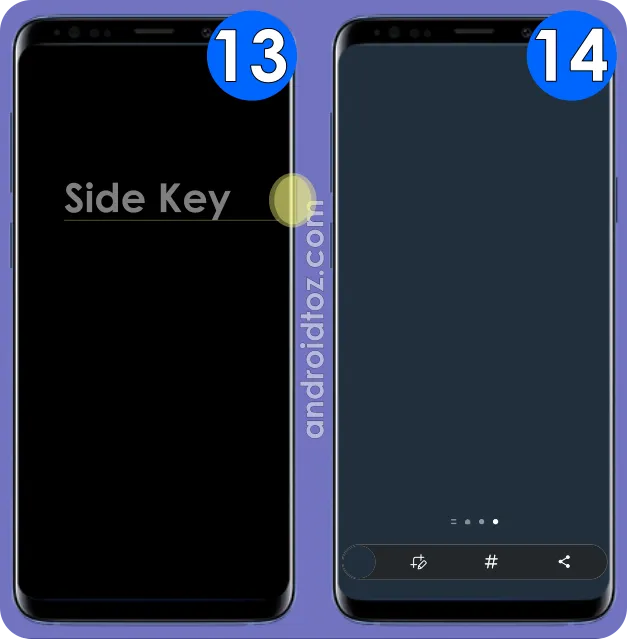
- Press and hold the Side Key to execute a screenshot.
Use Double or Triple Back Tap to Screenshot
Want to eliminate the reliance on hardware buttons and screen interactions while discovering an entertaining way to capture screenshots? Allow us to introduce the double-tap or triple-tap screenshot feature on Samsung, enabling you to capture screenshots with a simple double or triple tap on the back of your phone.
Here is how to double or triple-tap screenshots using RegiStar:
- Install the 'Good Lock' and 'RegiStar' module in it.
- Good Lock and particular modules might not be available in all countries.
- Open the 'Good Lock' app.
- Select the 'Life Up' menu and open 'RegiStar' module.
- Select 'Back-Tap Action'.
- Tap the toggle to enable the functionality.
- Increase the 'Sensitivity'.
- Otherwise, hard cases make the taps unrecognizable.
- Tap 'Double Tap' or 'Triple Tap'.
- Select 'Take and Share Screenshot'.
- Tap the 'Settings (Gear)' next to 'Take and Share Screenshot'.
- Select 'Basic' to just take a screenshot or select 'Share' to both take screenshots and open 'Share Menu' to share them.
- Open the app, page, or screen you wish to take a screenshot of.
- Double or triple-tap on the back of your Samsung phone or tablet to screenshot.
- Tap the area near 'Camera' for the best results.
Conclusion
Taking a screenshot on Samsung devices is incredibly easy and offers an array of 16 diverse methods to accomplish it. However, it's important to mention that some techniques are limited to specific Galaxy models, such as those involving the use of S Pen or Good Lock modules.
If you have additional questions regarding how to capture a screenshot on Samsung devices, please do not hesitate to leave a comment. We are here to help address any challenges you encounter to the best of our knowledge. If it is beyond our scope, we can also direct you to helpful resources for troubleshooting the issues you may encounter while trying to take screenshots.










Comments
Post a Comment