Feeling overwhelmed by the complexity of photo collage creation in third-party applications installed from the app market? Do not worry, enter the world of built-in Samsung collage creators in the Gallery and Camera app.
Come with us as we explore Samsung Collage, the free and built-in feature that allows Samsung members to create fascinating collages in seconds without a need for a third-party application.
- Create Collages on Samsung using Gallery
- Do Collages on Samsung using Camera
- Make Collages on Samsung using Third-Party Apps
- Edit Collage on Samsung Created from Gallery
- Edit Layout: Add New Visual Items & Change Layout
- Adjust Ratio: 1 to 1 to 16 to 9
- Modify Border: Change Roundness, Margin and Colour
- Rearrange Collage: Replace, Remove, Edit and More
- Conclusion
Create Collages on Samsung using Gallery
Creating collages on Samsung and other Android devices is a way to combine multiple photos or videos into a single one while attempting to ensure visual composition. Whether the social media account you want to share images with does not support multiple photos for a single post or simply you want to share unforgettable memories with your friends and loved ones with a captivating cover photo.
Just as making GIFs using Samsung Gallery, it is possible to create collages on Samsung as well.
Here is how to make a collage without an app:
- Open Gallery.
- Select the album (recent, screenshots, camera and so forth).
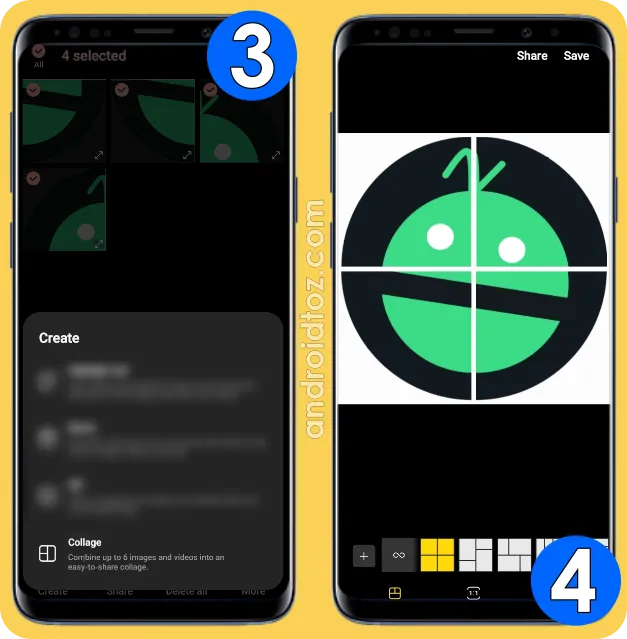
- Select the images, screenshots or videos to do a collage.
- For the first one, tap and hold until both it is selected and hollow circles appear in the top left of each picture.
- For the latter ones, only tap to select.
- Keep in mind that it is not possible to include more than 6 visual contents in collages.
- Tap "Create".
- Select "Collage".
- Edit the collage and tap "Save" to save it to Gallery and Internal Storage.
Alternatively,
- Open Gallery.
- Select the album (recent, screenshots, camera and so forth).
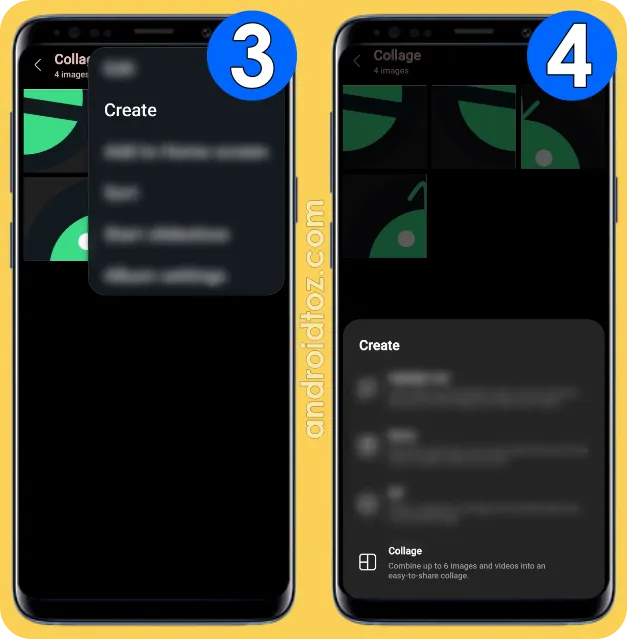
- Tap three-vertical-dots︙.
- Select "Create".
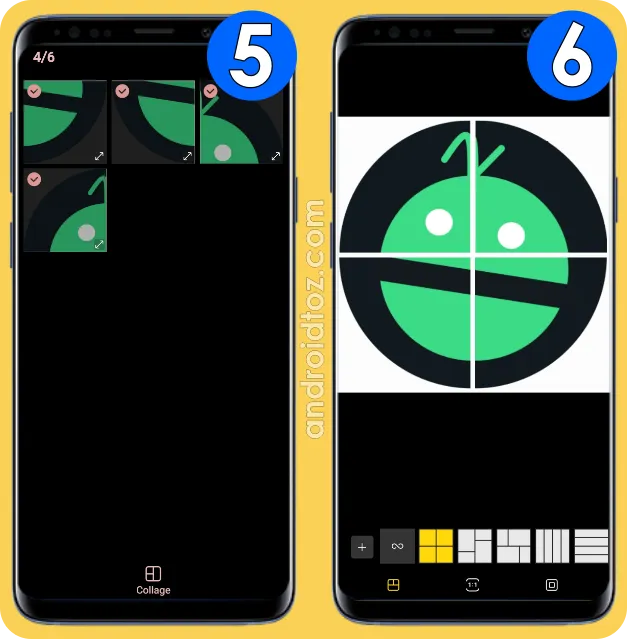
- Select the images, screenshots or videos to do a collage.
- Remember that collages can only include a maximum of 6 visual elements.
- Tap "Collage".
- Edit the collage and tap "Save" to save it to Gallery and Internal Storage.
Do Collages on Samsung using Camera
Ever wondered if your camera app on the Android system does more than just capture or record individual moments in time? What if the camera could transform your snapshots into interesting collages with the touch of AI (artificial intelligence)? Actually, it is doable thanks to "Single Take".
It records the space for up to 15 seconds, captures the various moments in the video and turns them into collages, cropped shots, boomerang clips and so forth with a touch of the camera's AI. The short end of the stick is that AI decides which moments to take randomly and there is no collage editor as there is in the Gallery app.
Curious to know how? Here is how to generate random collages:
- Open the Camera app.
- Tap "Single Take" mode.
- In case it is not available on the main page, check whether it is available on "More" or not. If not, the feature might not be supported by your Android device.
- Tap "Shots to Capture ≓" in the top right.
- Make sure "Collages" are selected and tap "OK" to save the settings.
- Tap "Record".
- Press "Stop" to end the photo-taking process before the timer runs out.
- Select +5s to extend the capture time by five seconds.
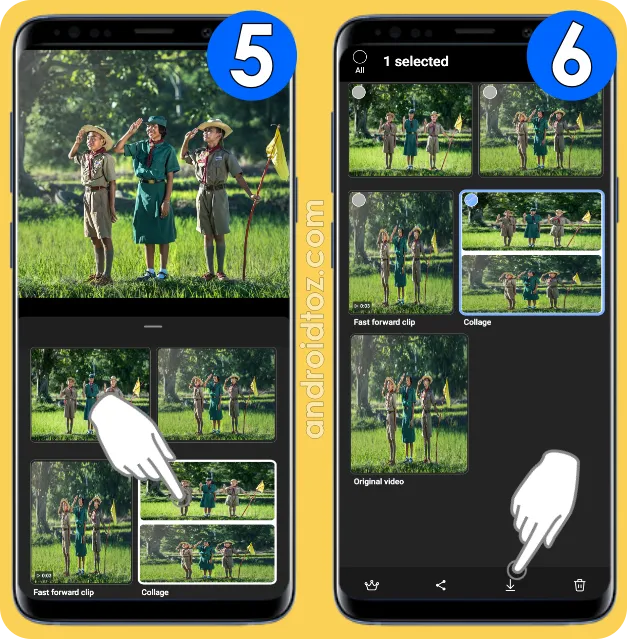
- Tap the Gallery thumbnail or directly open the Gallery app to view the Single Take format.
- Tap the dash (long horizontal bar) or swipe up from there to see all the created shots.
- Tap and hold the "Collage" to activate the additional menu.
- Tap "Download" to save the collage as a separate file in Gallery and Internal Storage.
Make Collages on Samsung using Third-Party Apps
Staring at your Samsung device, eager to find a way to turn your photos or videos into excellent collages, but finding no sign in the Gallery or Camera app? Well, the only remaining option is to install a third-party app from the app market either Google Play Store or Galaxy Store.
- Open Galaxy Store or Google Play Store.
- Tap "Search Box".
- Type "Collage Maker" and search.
- Download a third-party application that is secure.
- Open the collage maker and follow the instructions on the screen.
Edit Collage on Samsung Created from Gallery
Before delving right into explaining what can be done with the collage editor, it is wise to say that it is only available for collages created from Gallery. Unfortunately, collages created from the Camera are automatically detected by the AI making it more useless compared with the former option.
Once you have followed the steps in "Create Collages on Samsung using Gallery", the collage editor is opened to customize the appearance before saving it to the internal or external storage (SD Card).
Edit Layout: Add New Visual Items & Change Layout
Add Items
Provided that you have not inserted a maximum of 6 visual items into the collage, tap "+" to add additional items. By the time visual items are equal to 6, the "Add Items +" button will be disabled automatically by the system itself.
Here is how to add additional items to the collage:
- Make sure the "Layout" menu is opened.
- Tap "+" (Add Items).
- Select the visual element(s).
- Finally, tap "Done".
Change Layout
Felt like the pictures or videos need a little something extra, just like rearranging the pieces of the puzzle? If you are not satisfied with how the current layout looks, use the "Shuffle" button to add a bit of randomness, select a preset layout to find the best fit or adjust the borders on your own.
Want to know how to do them? Here is how to shuffle, select preset layouts or resize on your own:
- Make sure the "Layout" menu is opened.
- Select the layout style.
- Tap "Shuffle ∞" to rearrange the visual elements randomly,
- Tap "preset layouts" to find the optimal layout that matches visual items, or
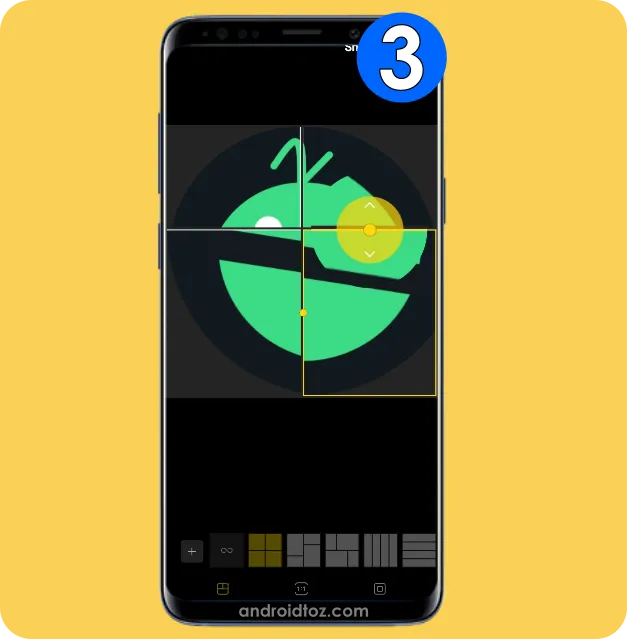
- Tap directly on one piece of the collage, tap the resize handle (yellow dot) and drag it up/down or left/right to make it small or large.
Adjust Ratio: 1 to 1 to 16 to 9
Layout only changes the size of the visual elements within a determined border. Do you want to give your collage a various visual perspective like making it more rectangle or square?
All Samsung users have the power to reshape the collage's aspect ratio, going beyond the default 1:1 frame to a cinematic 16:9 frame.
Curious to discover how to unlock this creative dimension? Here is how to adjust the ratio:
- Make sure that the "Ratio" menu is opened.
- Select the desired ratio:
- 1:1: A square aspect ratio, or 1 to 1 ratio, denotes an equal width and height. It is presented squarely on social networking sites like Instagram.
- 9:16: In a portrait aspect ratio, where the height is greater than the width, the ratio is 9 to 16 ratio. Vertical videos or photos on social media sites like TikTok and Instagram stories frequently use this aspect ratio.
- 16:9: A landscape aspect ratio is one in which the width is bigger than the height, such as a 16 to 9 ratio. Computer displays, television broadcasts, and films frequently use this aspect ratio.
Modify Border: Change Roundness, Margin and Colour
Add a touch of colourfulness to your collage? Adjusting the roundness and margin of the border is accomplishable with the built-in collage maker in Gallery. Other than that, picking the perfect background colour to make it truly yours is possible as well.
Ready to unlock? Here is how to modify the roundness, margin and colour of the border:
- Be sure that the "Border" menu is opened.
- Use the slider next to "Roundness╔" in order to decrease or increase the roundness.
- Use the slider next to "Margin ▣" to adjust the margin of the collage.
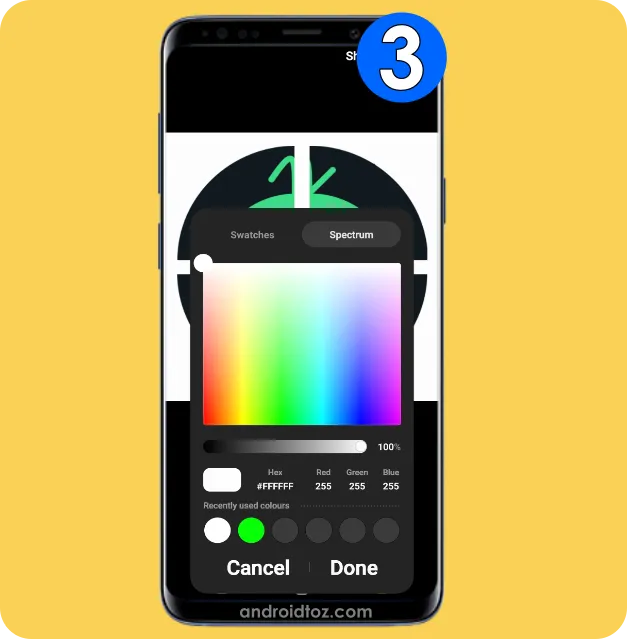
- Use the preset colours or "Colour Picker" to pick the background colour.
- The easiest way to select the colour is using the "Swatches" or "Spectrum".
- As long as you are familiar with HEX or RGB codes of the colours, do not hesitate to use those too.
Rearrange Collage: Replace, Remove, Edit and More
Is that all? No way, there is more to the story. In addition to all the aforementioned features, there is a set of handy tools to replace, remove, edit and zoom in/out visual contents in the collage.
Eager to explore the remaining ones? Here is how to replace, remove, edit, move or zoom in/out:
- Tap directly on the piece of the visual puzzle in the collage and make sure it is covered with a yellow line which corresponds to the fact that the visual element is selected.
- Decide which tool you want to use:
- Replace changes the visual content in the selected area of the collage with another visual content selected from the Gallery:
- Tap "Replace".
- Select the album.
- Select the picture, screenshot or video.
- Remove directly deletes the selected visual element from the collage:
- Tap "Remove".
- Edit opens the editor and lets the user edit the visual item such as adding filters, texts and so on:
- Tap "Edit".
- Use the editor to add filters, decorations and so forth.
- Tap "Done" to save the settings.
- Move allows users to swap the positions of two items within the collage or visual medium by dragging one item to the location of the other, effectively moving them to each other's positions:
- Tap and hold one piece of the visual element.
- Drag it to the new area.
- Zoom In/Out makes the image or video appear larger or smaller.
- Tap any one piece of the visual item.
- Pinch it or in other words, touch it with your two fingers and move together, to zoom in or out.
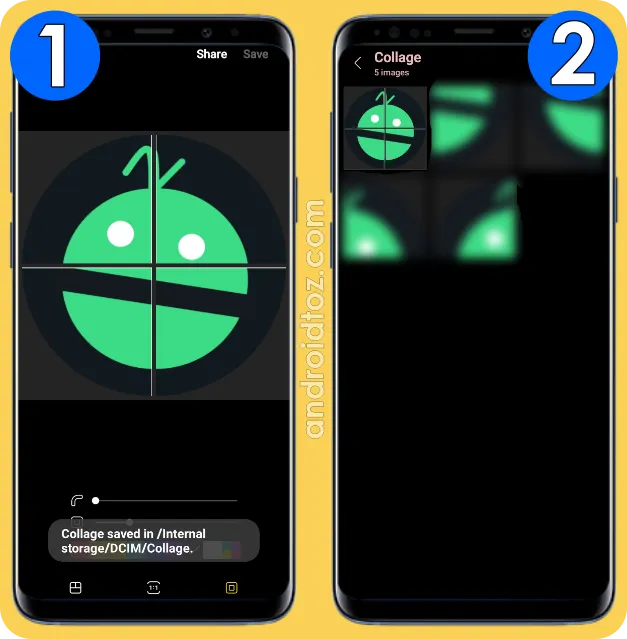
When you are satisfied with the final shape of the collage, you should save it to your Gallery by tapping on the "Save" button in the top right.
Once you tap on the Save button and it is saved, you will see a notification below that demonstrates where the collage has been saved on your Samsung phone or tablet. Provided that you see Internal Storage / DCIM that means it is saved to your Gallery and to the folder with the same name as the path directory in the My Files folder on your Samsung device.
Conclusion
Samsung provides the built-in collage-creating feature for many a long day. It might be created using the Gallery or Camera app. Gallery option offers the true collage-making experience with the freedom of selecting the visual contents and editing, while the Camera option is not programmed exclusively to create collages, however, it still creates that is determined by artificial intelligence. For the best result, it is good to do collages using Gallery instead of the Camera app.
In case you face a problem when you make collages on your Android device, you can freely leave a comment below. In this way, we can provide you with some solutions to your answer as long as we have knowledge of the topic. Do not worry, in other cases, we can provide some community articles for you to examine and solve the problem you try to tackle.










Comments
Post a Comment